

Baking Directions
-
PAW Patrol™ The Lookout Gingerbread Cookie Kit
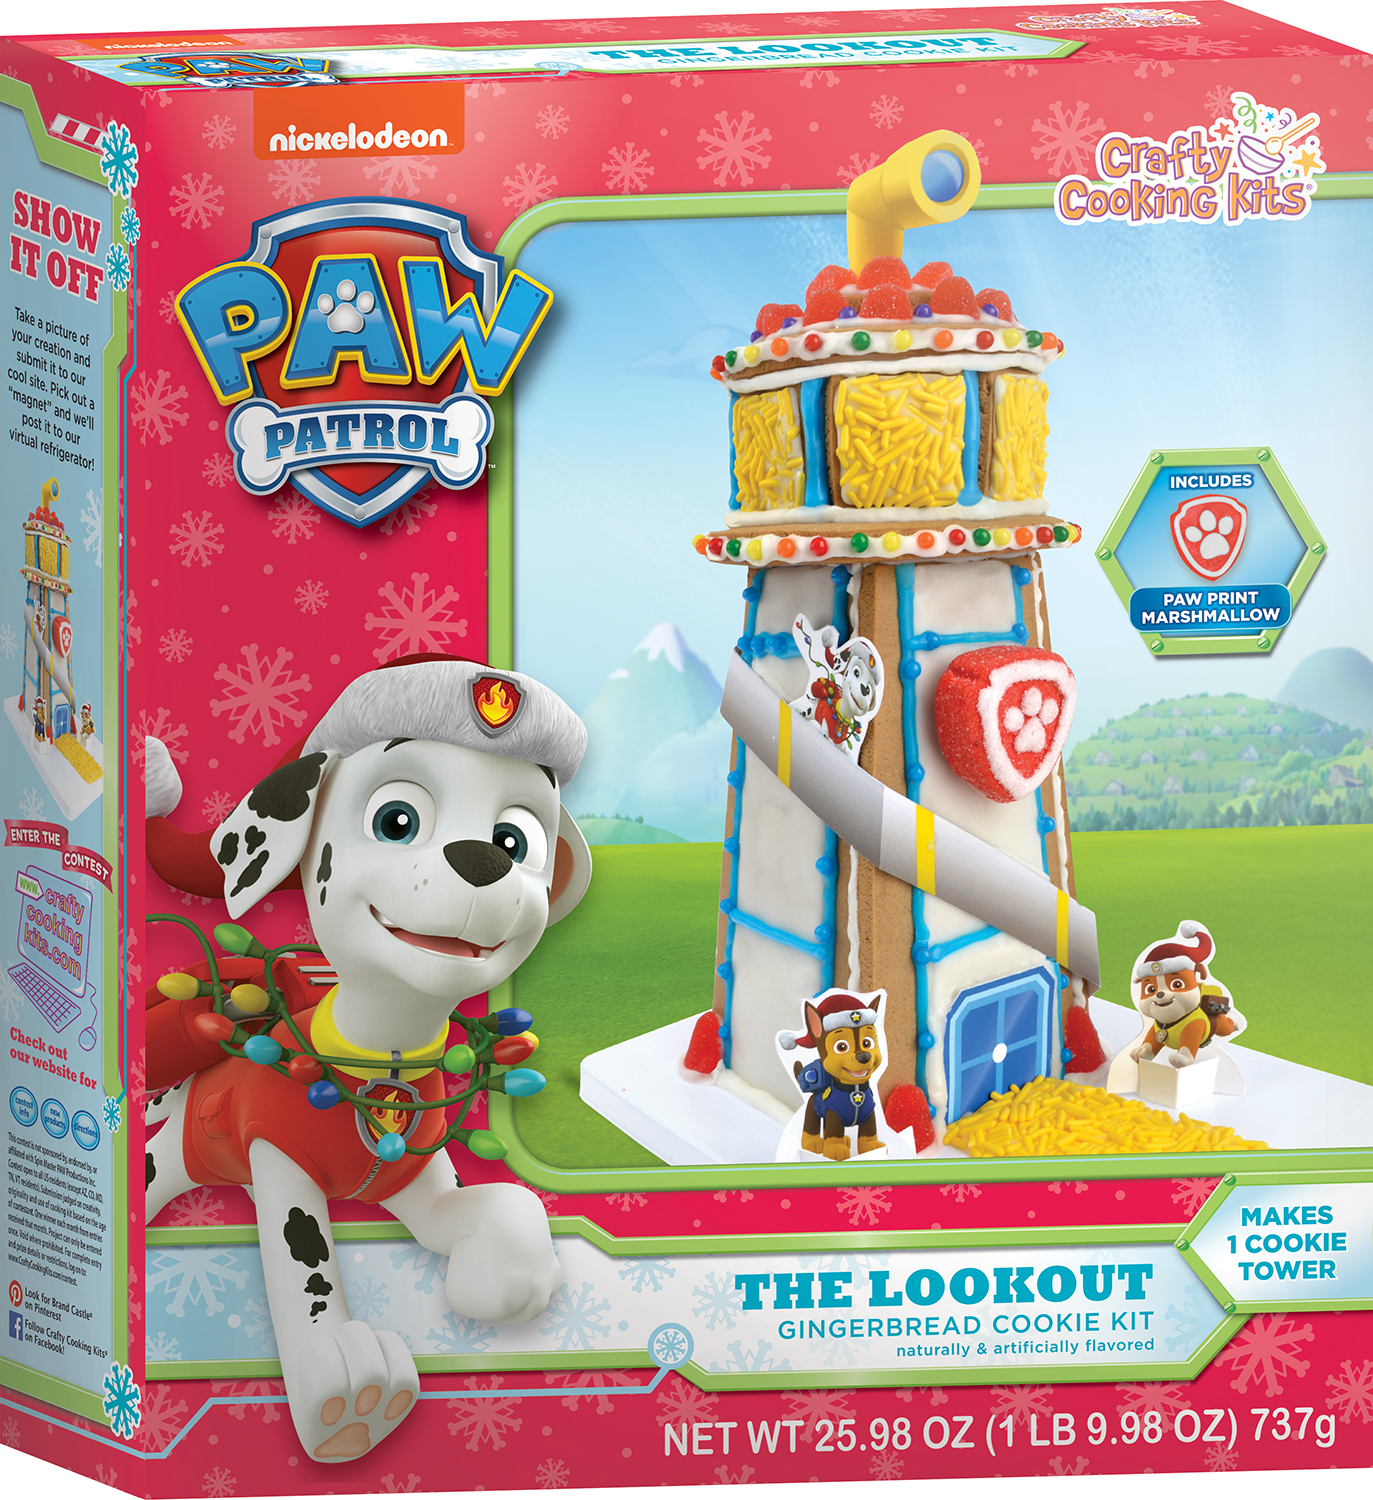
PAW Patrol™ The Lookout Gingerbread Cookie Kit
Email These DirectionsYou will need:
rimmed baking sheet, optional, for easy cleanupDIRECTIONS
(Adult Supervision Required)PREPARE
Kids Be sure to wash hands. Cooking can be messy work. You might want to wear a smock or apron.
Adults Knead icing pouch for 1 minute to a soft, smooth consistency. Stand the piping bag in a tall glass and pull down over the edges to hold it open. Cut across the bottom of the icing pouch and squeeze half of the icing into the piping bag. Twist top to close and set aside to be used in construction later. HINT: Use a rubber band to help hold the top of the piping bag closed.
Kids Squeeze the remaining icing into a small mixing bowl. Add 1 tsp. water and stir well to thin slightly. Carefully remove cookie pieces from packaging and lay out on a flat surface with the smooth sides facing up.ICE
Kids Remove candies from pouches and place in small bowls. Use a small butter knife or spatula to spread icing onto the large watchtower wall pieces and set aside to firm. Place the six cupola windows on the baking sheet. Spread with icing and cover with the yellow sprinkles as desired (Figure 1). Refer to box for inspiration. Set aside to allow icing to firm before you build your watchtower.BUILD
Adults When the iced pieces have dried firm to the touch, cut 1/4 inch off the end of the piping bag to create an opening that will yield a 1/4-inch wide strip of icing when piped (Figure 2). HINT: Start small and adjust if necessary. You do not need a very thick line of icing; a little goes a long way in construction. Pipe a dab of icing in each of the four corners of the watchtower base. Being mindful of the icing, take one of the watchtower wall pieces and carefully hold it in your hand so the back of the cookie faces up. Pipe a line of icing along the left back edge of the cookie and stand it into the corner of the base so that that edge aligns with an open channel of the base. Press gently to secure. Take a second watchtower wall piece and pipe a line of icing along the left back edge. Stand it into the base so that the right edge of that piece is pressed against the iced side of the first piece and gently hold in position (Figure 3). Repeat with the remaining two wall pieces and allow watchtower to set for 10 minutes to firm. Pipe a line of icing along the top edges of the watchtower walls and place the large, embossed circular cookie on top (Figure 4). Build the cupola windows by piping a line of icing on each side of the decorated window pieces and press each window into the cupola base and another window next to it to secure. Allow watchtower to set for 5 minutes to firm (Figure 5). Carefully pipe a line of icing along the top of the windows. Gently set the large, non-embossed circular cookie on top, pressing slightly to adhere. Stack the small cookie circle on top and allow the tower to set for 5 minutes before the kids can finish decorating.DECORATE
Adults Cut a small tip off the icing pen.
Kids Use the blue icing pen to decorate your watchtower. Leftover icing can be used to adhere candies, gumdrops and the paw print marshmallow piece. HINT: Gumdrops can be cut into shapes using kitchen scissors. The watchtower base may be decorated as well. Refer to box for inspiration. Squeeze a dab of icing onto the door piece to secure it into place. ADULT HINT: Fold the telescope along the creases and assist kids with using dabs of icing to secure it to the watchtower. Insert character paper pieces into their paper stands and place around watchtower as desired. Allow Paw Patrol Watchtower to dry completely before carefully moving, if necessary. Admire and enjoy!Yield: 1 Paw Patrol RTE Gingerbread Watchtower
-
Pick-A-Pumpkin Sugar Cookie Kit
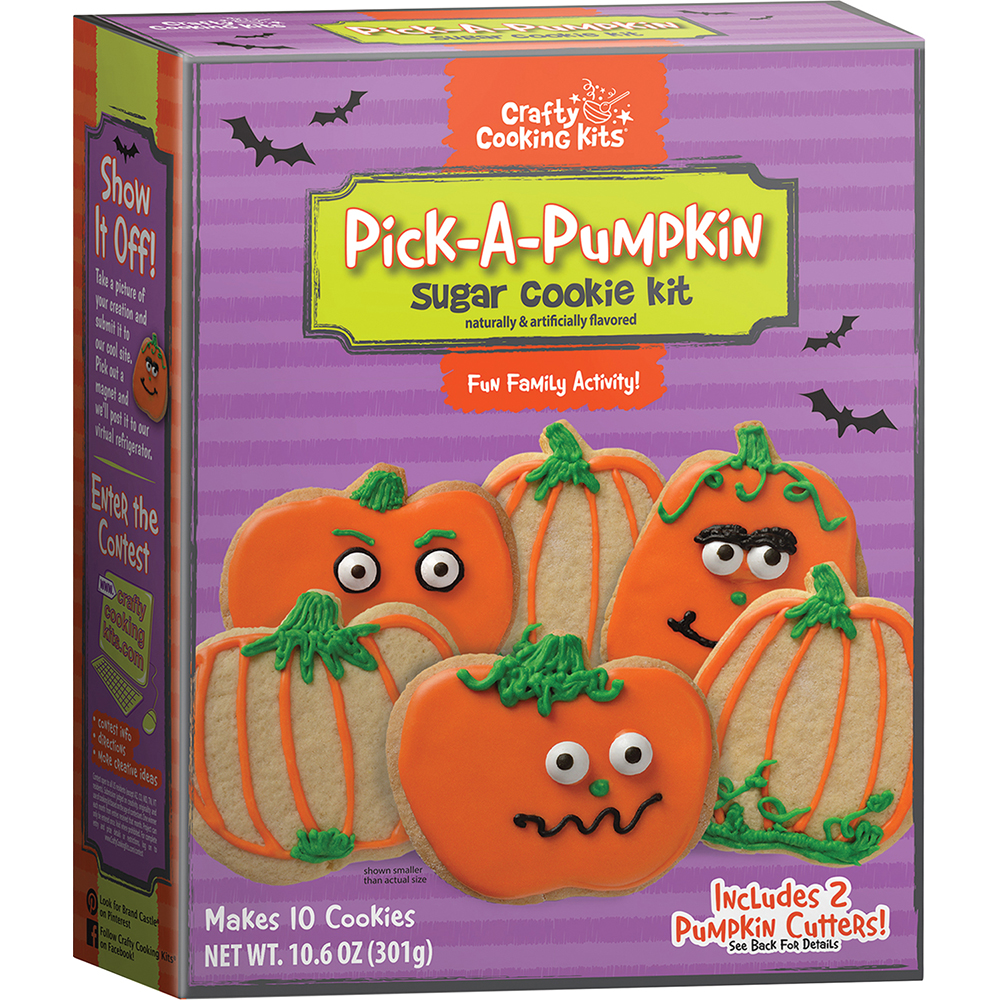
Pick-A-Pumpkin Sugar Cookie Kit
Email These DirectionsYou will need:
For cookies:
4 TBSP room temperature butter
1 eggFor royal icing:
2 ½ tsp water
1/2 cup powdered sugarPrepare
Adults: Preheat oven to 350°F. Lightly grease baking sheet with butter or cooking spray. Wash cutters in warm, soapy water and dry well.
Kids: Be sure to wash hands. Cooking can be messy work. You might want to wear a smock or apron.Mix
Kids: Combine cookie mix, butter and egg*. Mix until well blended.
On a lightly floured surface, roll cookie dough to 3/16-inch thick. Cut shapes with cutters, gathering and rerolling dough as necessary. Place 2 inches apart on prepared baking sheet.Bake
Adults: Bake for 12 to 15 minutes or until edges are golden. Let cookies cool on baking sheet for 1 minute. Transfer to rack and allow to cool completely.Ice
Kids: In a small mixing bowl, combine icing mix, orange color powder and water; stir until dissolved. Add powdered sugar and whisk with a fork until smooth. Empty candy eyes into a small bowl.
Adults: Spread icing over cooled cookies. If you wish to make stripes, insert the piping bag into a tall glass and pull edges down over glass to hold open. Use a spatula to fill with icing. Twist top to close, cut a small tip off of the piping bag, and pipe stripes as desired.
Kids: Press eyes into place as desired. Allow icing to set for 30 minutes. HINT: Placing the cookies in the refrigerator will speed up the process.Decorate
Kids: Cut tips off of the icing pens and add jack-o-lantern facial features and leafy embellishments. Refer to box for inspiration. Place finished cookies on a platter and enjoy!* High Altitude (over 3500 ft): Add 3 TBSP flour and 2 TBSP water to mix. Mix as directed. Place dough in refrigerator for 10 minutes before beginning rolling process.
Yield: 10 Pick-A-Pumpkin Sugar Cookies
-
Rabbit Hole Cupcake Kit
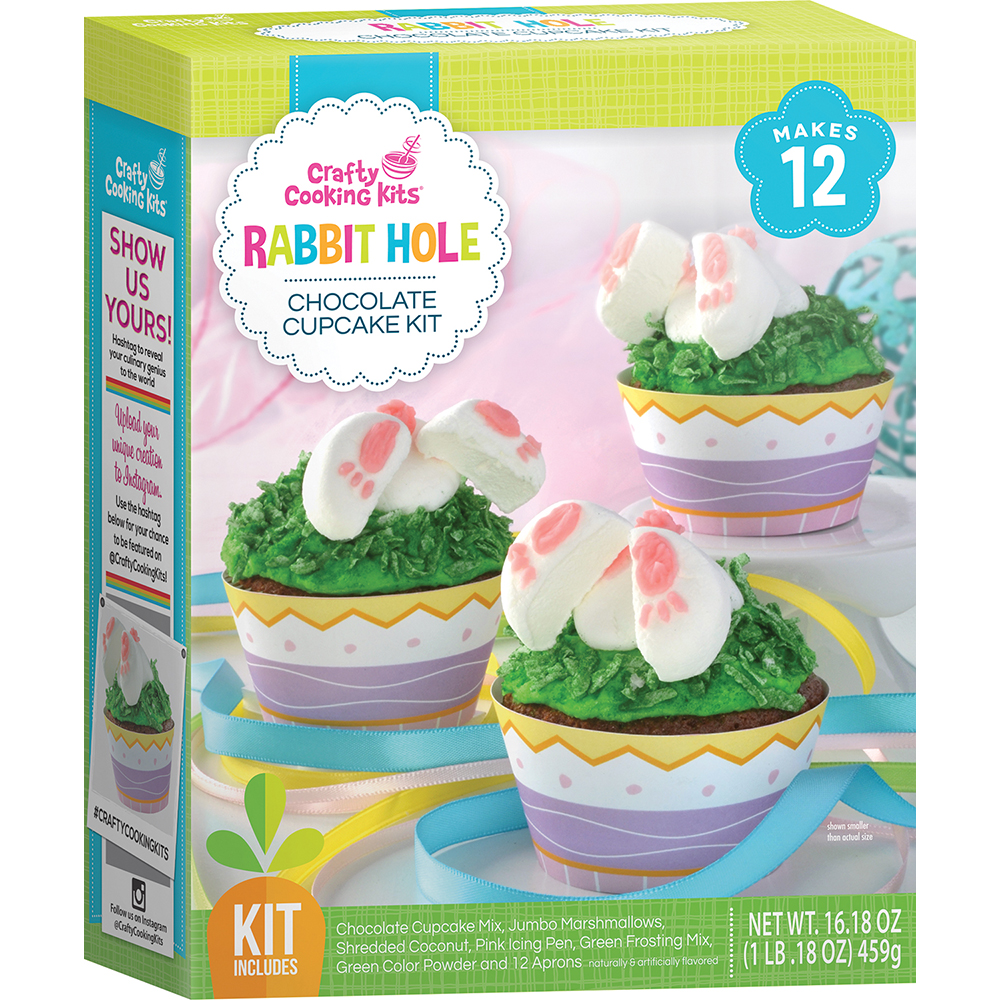
Rabbit Hole Cupcake Kit
Email These DirectionsYou will need:
For cupcakes:
3 TBSP room temperature butter
1/3 cup water
2 eggsFor green frosting:
8 TBSP room temperature butter
2 cups powdered sugar
2 TBSP milk12 baking liners (not included)
sandwich bag, to assist with decoratingDirections
Cupcakes:
1. Preheat conventional oven to 375F. Line muffin pan with 12 liners (not included).
2. Combine cupcake mix, butter, water and egg*. Using an electric mixer, mix on LOW just until combined.
3. Distribute batter evenly into lined muffin cups. Bake for 16 to 18 minutes or until toothpick inserted into center comes out clean. Allow to cool completely. Assemble cupcake aprons by interlocking the ends together and insert a cupcake in each apron.Frosting:
1. Using an electric mixer, beat room temperature butter on HIGH 1 minute or until light and fluffy.
2. Add frosting mix and powdered sugar and beat on LOW until combined. Add milk and beat on HIGH until creamy.
3. Create bunnies by cutting 6 marshmallows in half diagonally (see figure 1). Spread frosting onto cupcakes and place marshmallow sticky side down onto frosting so the bottom portion of the marshmallow is facing the outer edge of the cupcake. Spread a bit of frosting over the point to create a burrowing effect.
4. Empty coconut and plastic green color powder pouch into a sandwich bag, close tightly and shake to coat. Sprinkle over frosting to create grass.
5. Cut each of the remaining marshmallows in half (see figure 2) and then in half again. You will end up with 2 pair of feet from each marshmallow (see figure 3).
6. Cut a tip off of the icing pen, press a dab of icing on the cut side of each foot, and press onto bunny’s body. Pipe a fluffy tail and feet on each bunny. Assemble cupcake aprons by interlocking the ends together and insert a cupcake in each apron. Transfer cupcakes to serving platter and enjoy!*High Altitude (over 3500 ft): Add ½ cup flour to mix, bake at 375˚F for 18 to 20 minutes. Make 13 cupcakes.
Yield: 12 Rabbit Hole Cupcakes
-
Rainbow Animal Sugar Cookie Kit
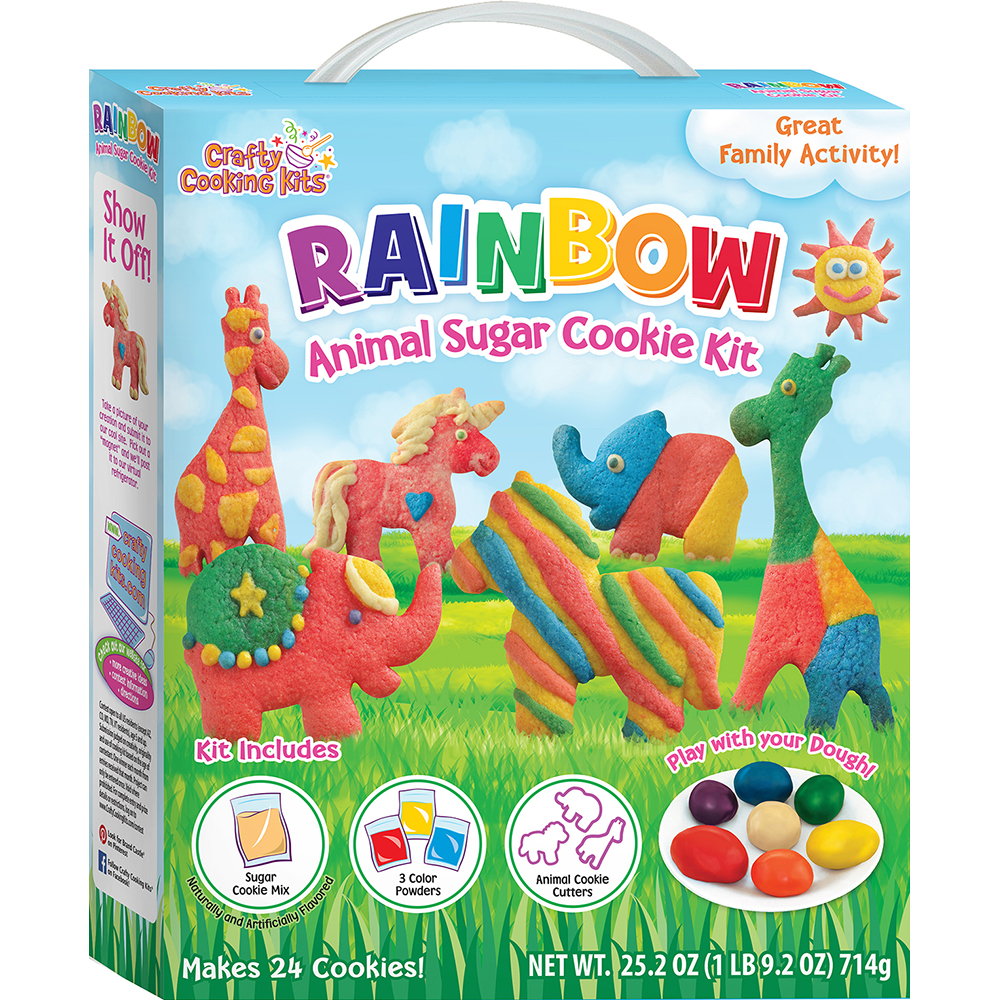
Rainbow Animal Sugar Cookie Kit
Email These DirectionsYou will need:
12 TBSP room temperature butter
3 eggsDIRECTIONS
1. PREPARE
Adults: Grease baking sheet with cooking spray, or use silicone liners. Wash cutters in warm, soapy water and dry thoroughly.
Kids: Be sure to wash hands. Cooking can be messy work. You might want to wear a smock or apron.2. MIX
Kids: Combine cookie mix, butter and eggs in large mixing bowl. Mix until well combined. Form dough into a ball and place on floured surface.3. COLOR
Kids: Divide dough evenly into four parts. Three parts will become primary colors and one will remain plain. Form a well in center of one dough ball and place into a mixing bowl. Empty one color powder into well. Use hands to knead color evenly into dough until color is vivid. Place colored dough onto floured surface. Wash hands and bowl to remove any color before repeating process with remaining color powders and dough. To make secondary colors, combine two primary colors (see color chart) and work dough for a few minutes until color is vivid. To lighten colors, add plain dough to primary or secondary colors. Chill dough in refrigerator 5 to 7 minutes to make rolling easier.4. SHAPE
Kids: Place dough onto lightly floured surface and turn to coat both sides. Roll dough to 1/4 inch thick and cut shapes with included cutters, gathering and rerolling dough as needed but returning colored scraps back to their proper color piles. HINT: Dough will warm with repeated playing. If dough becomes sticky, place in refrigerator for 10 minutes and flour rolling pin and dough liberally. Press contrasting colored dough onto cookies to create fun designs. HINT: Another way to achieve a multicolored animal is to cut 2 of the same animal out of two colors of dough. Cut off portions of each animal and press contrasting pieces next to each other on cookie sheet.
Adults: Place cookies 2 inches apart on prepared baking sheet and chill in the refrigerator while oven preheats to help cookies retain their shapes.5. BAKE
Adults: Preheat conventional oven to 350F. Bake for 10 to 14 minutes. Baking time will vary depending on thickness of cookies – be sure to monitor cookies while baking and remove when edges are slightly golden. HINT: Cookie colors darken as they bake; do not over bake. Allow to cool for 1 minute on baking sheet, then move cookies to rack and cool completely. Place on serving platter and enjoy!Color Chart
Make secondary colors from your primary colors.
Red+Yellow=Orange
Blue+Yellow=Green
Blue+Red=PurpleHints for successful play:
*Flour dough and surface liberally; dough warms with continued play
*Refrigerate shapes on cookie sheets prior to baking to help retain shape
*Remove cookies from oven halfway through baking and adjust shape with a spatula if necessary before returning to oven
*Very thin cookies with long pieces may break; do not roll or stretch too thin
*Toothpicks help create texture, such as hair or fur.
*Twist ropes of colored dough together before rolling out to create tie-dye effect.Yield: 24 Rainbow Animal Cookies
-
Raise The Dead Cupcake Kit

Raise The Dead Cupcake Kit
Email These DirectionsYou will need
For chocolate cake:
1/3 cup water
3 TBSP. butter
2 eggs
12 baking liners (not included)For chocolate frosting:
8 TBSP. room temperature butter
2 cups powdered sugar
2 TBSP. milkCupcakes:
1. Preheat conventional oven to 375°F. Line muffin pan with 12 liners (not included). Wash zombie picks with soap and warm water and dry thoroughly.
2. Combine cupcake mix, butter, water and eggs*. Using an electric mixer, mix on LOW just until well combined.
3. Distribute batter evenly into 12 muffin cups. Bake for 16 to 18 minutes or until toothpick inserted into center comes out clean. Allow to cool completely.
4. Assemble aprons by interlocking ends and set one cupcake in each apron.Frosting:
Beat room temperature butter on HIGH until light and fluffy, about 1 minute. Add frosting mix and powdered sugar; beat on LOW until combined. Add milk and beat on HIGH until creamy.Decorate:
Use the tip of a spoon to scoop out a tiny portion of each cupcake’s center;
crumble into small bowl. Spread frosting over cupcakes. Top with sprinkles and a
small pile of cake crumbles in the center to look like grass and dirt. Insert a
Zombie hand pick** into the crumbs. Refer to box for inspiration. Transfer to a
serving platter and share your Zombie invasion with friends and family!*High Altitude (over 3500 ft.): Add 1/2 cup flour to mix, bake at 375˚F for 18 to 20 minutes. Make 13 cupcakes.
**remove pick prior to eating
Yield: 12 Raise the Dead Cupcakes
10.5 oz chocolate cake mix
1 oz chocolate frosting mix (true)
1 oz green sprinkles
s/12 plastic zombie hand picks
s/12 zombie aprons -
Samurai Santa Cookie Kit
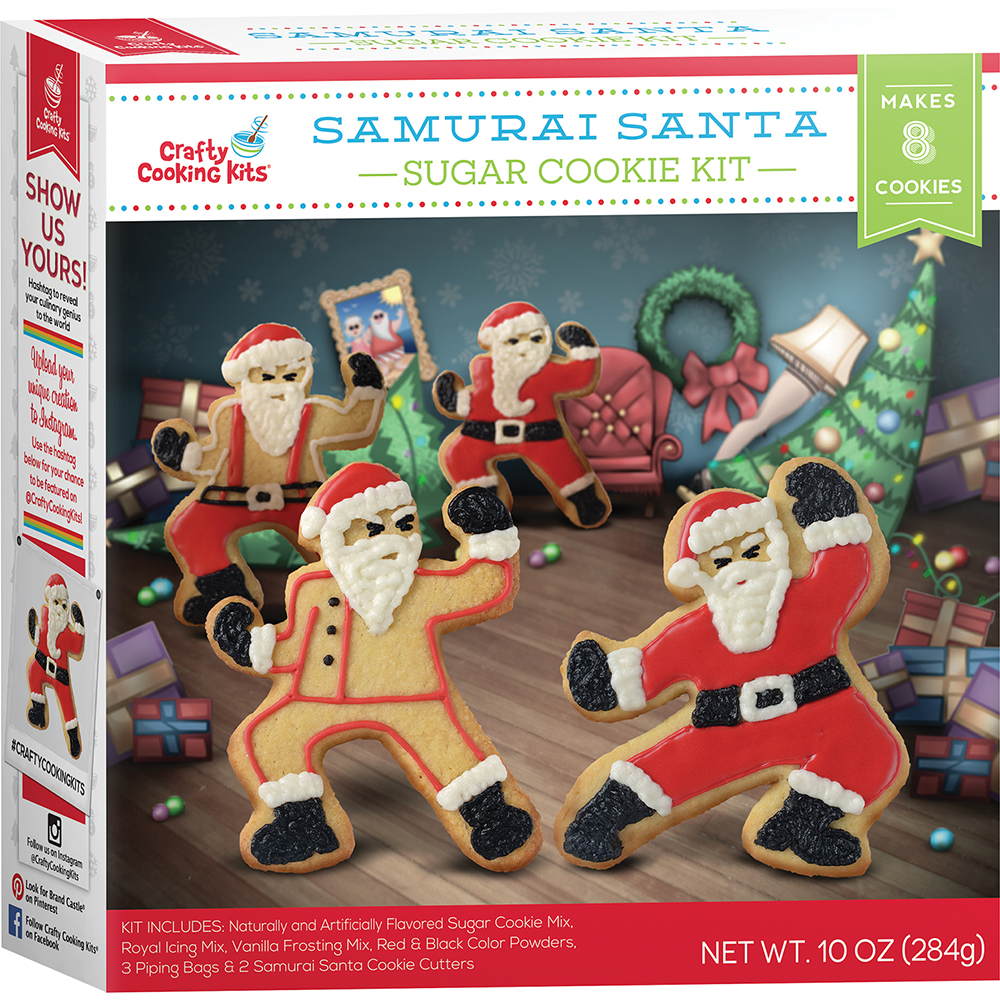
Samurai Santa Cookie Kit
Email These DirectionsYou will need:
For cookies:
4 TBSP room temperature butter
1 eggFor royal icing:
3 1/2 tsp. water
1/2 cup powdered sugarFor vanilla frosting:
4 TBSP room temperature butter
1 cup powdered sugar
1 TBSP milkDIRECTIONS
Bake cookies:
1. Preheat oven to 350°F. Wash cutters with warm, soapy water and dry thoroughly. Lightly grease a baking sheet.
2. Combine cookie mix, room temperature butter, and egg*. Mix until well-blended.
3. On a lightly floured surface, roll cookie dough to 3/16-inch thick or desired thickness. Cut into shapes with cutters, gathering and rerolling as necessary. Place 2 inches apart on prepared baking sheet.
4. Bake for 11 to 14 minutes or until golden. HINT: Thicker cookies will need longer to bake while thinner cookies will bake faster.
5. Let cookies cool on baking sheet for 1 minute. Transfer to rack to cool completely.Make frostings:
1. Dissolve royal icing mix, red color powder and water in a mixing bowl. Add powdered sugar and mix with a fork until smooth. Drape edges of one piping bag over a glass and transfer icing to bag. Twist top of bag to close and set aside.
2. To make frostings, use an electric mixer to beat room temperature butter on HIGH for one minute, or until light and fluffy.
3. Add frosting mix and powdered sugar and mix on LOW just until combined. Add milk and beat frosting on HIGH for 1 minute until creamy.
4. Divide frosting in half and add contents of black color powder to one bowl, whisking well to combine. NOTE: Color will darken as it dries. Transfer both colors of frosting to piping bags in the same manner as above.Decorate:
1. Cut a small tip off of the red royal icing piping bag and pipe clothing onto cookies. HINT: Squeeze a quarter-sized dab of icing onto cookie and use a small spatula or kitchen knife to smooth the surface. Allow icing to dry 10 minutes.
2. Cut small tips off of the white and black piping bags and pipe samurai facial features. HINT: Do not cut the openings too large, you can always adjust once the faces are in place. Add fluffy beards, mittens, and kickin’ boots to your black belt baked goods. Transfer to a serving platter and enjoy!*High Altitude (over 3500 ft): Add 3 TBSP flour and 2 TBSP water to mix. Mix as directed. Place dough in refrigerator for 10 minutes before beginning rolling process.
Yield: 8 Samurai Santa Sugar Cookies
-
Santa Claus is Comin’ to Town Santa’s Workshop Gingerbread Cookie Kit
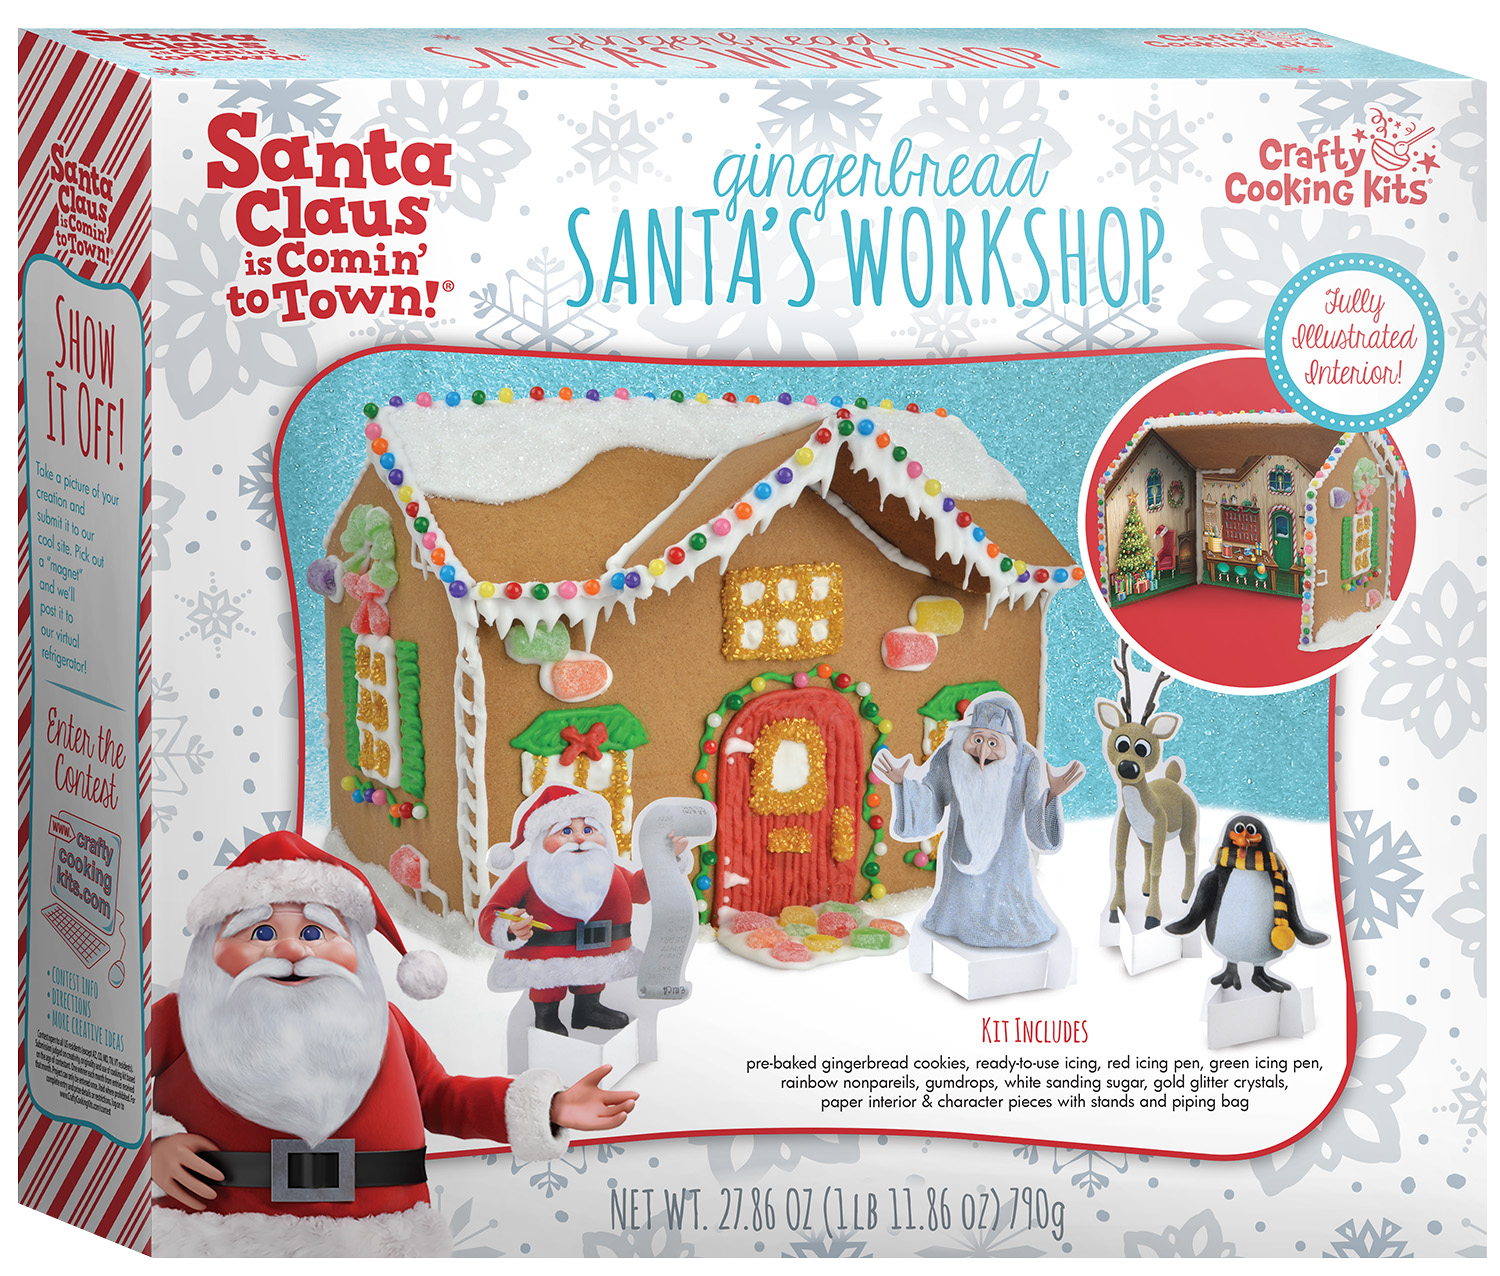
Santa Claus is Comin’ to Town Santa’s Workshop Gingerbread Cookie Kit
Email These Directions4/17/17
You will need
Platter or cutting board, as workshop base
Rimmed cookie sheet or waxed paper, optional, for ease in decoratingDIRECTIONS
(Adult Supervision Required)PREPARE
Adults Knead icing pouch for 1 minute to a soft, smooth consistency. Snip the corner of the icing pouch to a ¼-inch opening. Be careful not to cut the opening too large. Squeeze half of the pouch into a mixing bowl and set the pouch aside to use in building the workshop later. Stir 1 tsp. water into the bowl to thin icing slightly. Stand piping bag in a tall glass and drape over edges to hold open. Use a spatula to transfer icing into piping bag. Twist top to close and cut a small tip. Shake icing pens vigorously and cut the tip off each.DECORATE
Kids Remove candies and sugars from pouches and place into bowls. Carefully remove cookie pieces from packaging and lay out on a flat surface with smooth sides of cookies facing up. Decorate workshop pieces with icing and candies. Sprinkle with sugars as desired and tap off excess over a rimmed baking sheet or waxed paper. ADULT HINT: Gumdrops can be cut and shaped with kitchen scissors. Allow decorated pieces to dry thoroughly before building workshop.BUILD
Adults Being mindful of decorations, pipe a line of frosting next to the side edges on the back of cookie piece A. Pipe another line on the bottom of that same piece (figure 1). Pipe a line of frosting on the bottom edge of both side pieces B & C (figure 2). Stand the front cookie piece onto the platter and press gently to adhere. Press one of the side pieces in place to form a right angle (figure 3). Repeat with the other side piece. Hold cookies in position for 1 minute to allow icing to begin to set. Let workshop rest for 10 minutes before continuing. Pipe a line of icing along the angled edge of the side wall that faces front and carefully position roof into place, allowing it to rest on front dormer (figure 4). Pipe lines of icing on the angled edges of both dormer pieces and press into position above the door (figure 5). Allow assembled workshop to set for at least 10 minutes before any further decorating.
Kids Squeeze a small dab of icing onto the corners of the back of each interior paper piece. ADULT HINT: Assist kids in gently pressing paper pieces into position to form the inside of the workshop. Insert character paper pieces into their paper stands and place around workshop as desired. Allow Santa’s workshop to dry completely for 30 minutes before carefully moving. Admire and enjoy!HINT: Use items from your pantry like coconut shavings, powdered sugar or granulated sugar to create a snowy scene!
Yield: 1 Santa Claus is Coming to Town Gingerbread Workshop
-
Scooby-Doo! Creepy Castle Kit
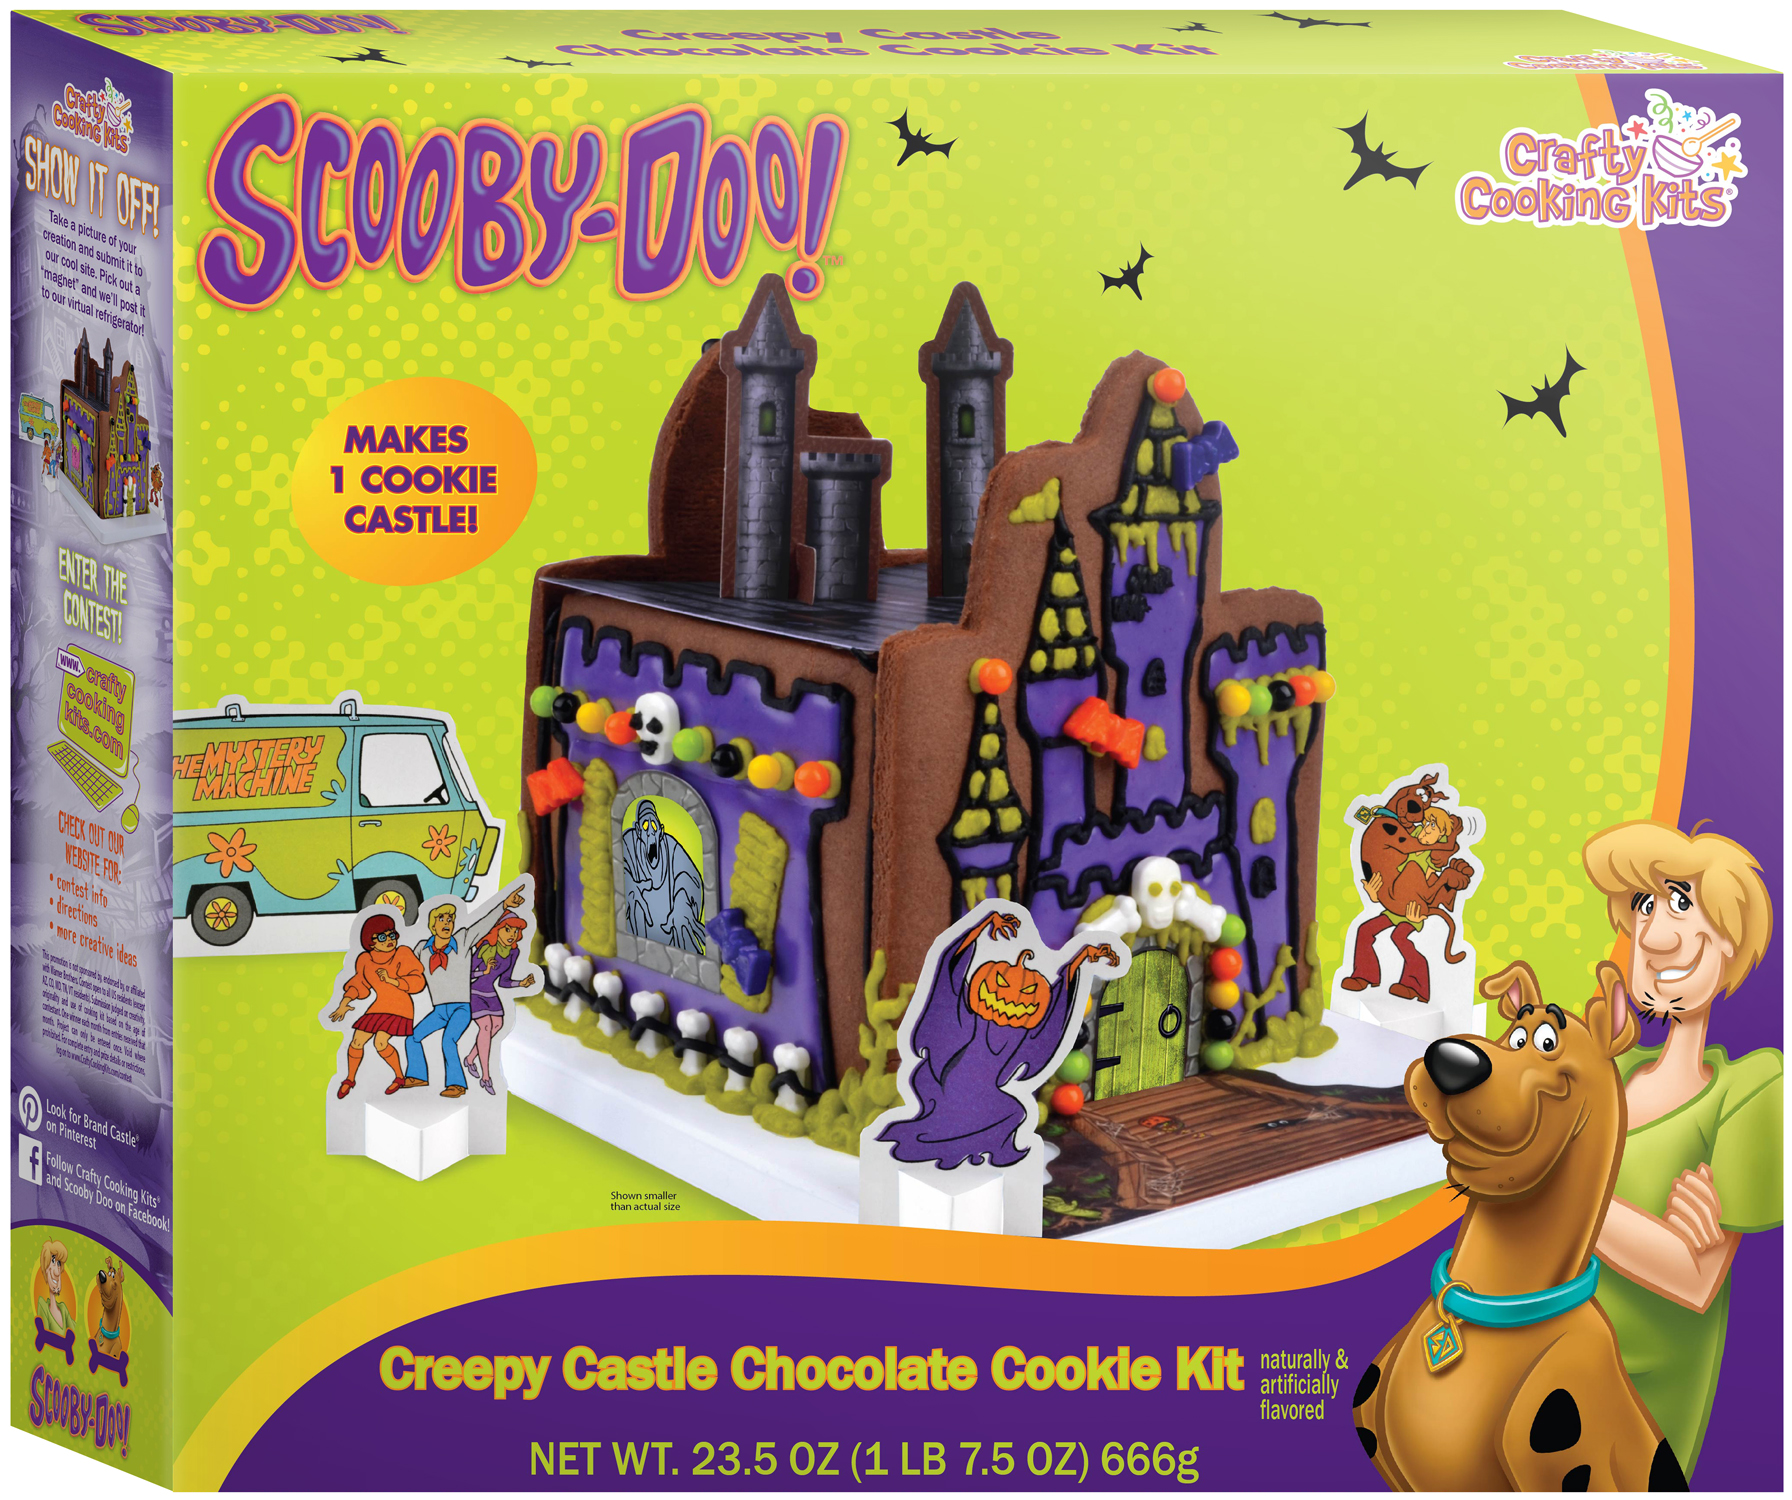
Scooby-Doo! Creepy Castle Kit
Email These DirectionsYou will need:
For icing:
2 cups powdered sugar
2 TBSP. + 2 tsp. milk
2 TBSP. light corn syrupFor neon green frosting:
4 TBSP. room temperature butter
1 cup powdered sugar
1 TBSP. milkDIRECTIONS
(Adult Supervision Required. Read directions all the way through before beginning; iced pieces need time to dry once decorated.)PREPARE
Adults Carefully remove cookie pieces from packaging and lay out on a flat surface with embossed sides of cookies facing up. Combine purple icing mix, powdered sugar, milk and corn syrup in a mixing bowl; whisk well until smooth and color is well blended. Insert a piping bag into a glass and pull over edges to hold open. Use a spatula to empty icing into piping bag. Twist top to close, keep in glass, and set aside. HINT: Use a rubber band to help hold the top of the piping bag closed.ICE
Kids Empty candies into small bowls.
Adults Cut a small tip off the piping bag. HINT: Start with a small tip, you can always make it larger.
Kids Fill in embossed areas of the cookie by applying gentle pressure and piping a thin layer of icing onto cookie. Use tip of the piping bag to help push icing over areas as desired. Refer to box for inspiration. A toothpick may be helpful to push icing into small corners. HINT: Do not apply icing thickly. Thinly spread icing dries faster. If you want to add candies to the cookies, you can do this now, or later, after the castle is built. ADULT HELP: Place decorated cookies in the refrigerator for 10 minutes to allow icing to set. Make sure all decorated cookies have dried firm to the touch before assembling the castle.
Adults While icing sets, make the neon green frosting: beat butter with an electric mixer on HIGH until light and fluffy. Add frosting mix and powdered sugar, and beat on LOW until combined. Add milk and beat on HIGH for 1 minute until creamy. Transfer frosting to piping bag in the same manner as above. Twist top to close and cut a small tip. Set aside while you build your castle.
Kids Knead the foil icing pouch for 1 minute to a smooth consistency. Cut off the bottom of the pouch and squeeze it out into a small mixing bowl. Add the contents of the black color pouch and 1 tsp. water and mix well to combine and thin slightly.
Adults Stand the last piping bag in a tall glass and pull down over edges to make filling easier. Use a spatula to transfer icing into the piping bag and twist top to close.BUILD AND DECORATE
Adults Cut a small tip off the bag (don’t cut too large as you will be using this bag to decorate your house later) and squeeze a 1/4-inch dab of icing into all 4 corners of the plastic base. Pipe a strip of icing next to the edges on the rough side of the front castle piece and insert into place on the base. Be mindful of any decorations. Insert 1 rectangular side piece into the base and press to adhere to the iced cookie edge. Repeat with the other side piece. Pipe a line of icing along the remaining exposed edges of side pieces and press the tall back cookie panel into place. Allow to set 5 minutes before applying roof. Apply a line of icing along the top edges of the castle. Gently attach roof cardboard piece and allow to set for 1 minute.
Kids Use the green frosting, any remaining black and purple icings, and candy pieces to finish decorating your castle. Refer to box for inspiration. Secure windows, door, steps and candies with dabs of icing. Consider adding creepy vines or crooked window shutters. HINT: The plastic base can be decorated as well! Insert the tower pieces into their tabs and carefully place on the roof. Insert character paper pieces into their paper stands and place around castle as desired. Allow haunted castle to dry completely for 30 minutes before carefully moving. Admire and enjoy!Yield: 1 Scooby Doo Creepy Castle
-
Snow Cone Cupcake Kit
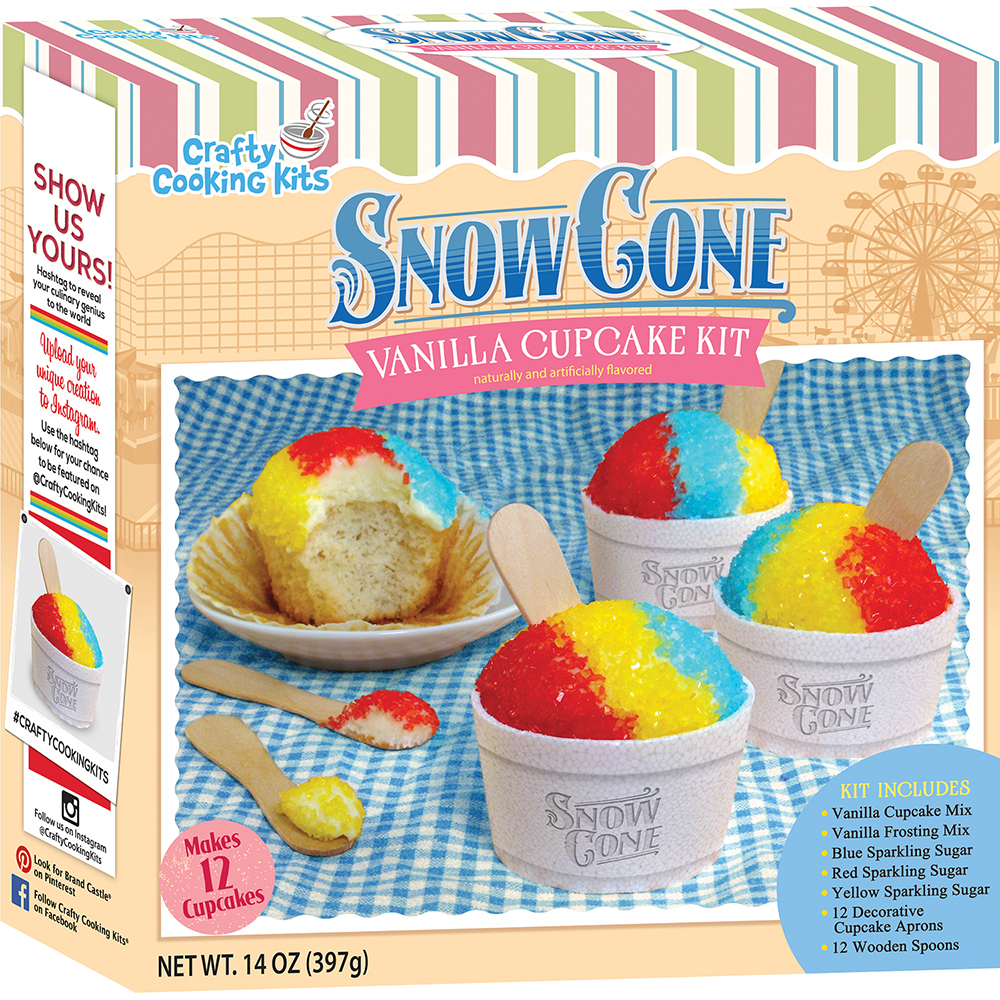
Snow Cone Cupcake Kit
Email These DirectionsYou will need:
For vanilla cupcakes: For vanilla frosting:
4 TBSP. butter 8 TBSP. room temperature butter
1/2 cup water 2 cups powdered sugar
2 eggs 2 TBSP. milkFor Cupcakes:
1. Preheat conventional oven to 375F. Line 12 muffin cups with baking liners (not included).
2. Using an electric mixer, combine cupcake mix, butter, water and eggs*. Mix until well blended. Distribute batter evenly, filling each liner no more than 2/3 full.
3. Bake for 16 to 18 minutes or until toothpick inserted in center comes out clean. Cool cupcakes completely before frosting.For Frosting:
1. Using an electric mixer, beat room temperature butter on HIGH for 1 minute or until light and fluffy.
2. Add frosting mix and powdered sugar and mix on LOW until combined. Add milk and beat on HIGH until creamy.
3. Spread each cupcake with frosting. Empty each pouch of colored sugar onto a small, rimmed plate.
4. Using box as inspiration, tilt cupcake and roll one side in colored sugar of choice. Repeat on other side so colors meet or leave a strip in the middle to coat with another sugar color. HINT: Sugars will only stick to frosting. Assemble the cupcake aprons by interlocking the ends together and insert a cupcake in each apron. Insert a wooden spoon in cupcake to complete the look. Transfer to serving platter and enjoy!*High Altitude (over 3500 ft): Add 1/2 cup flour to mix; decrease water to 1/3 cup. Mix only until well blended. Make 15 cupcakes.
Yield: 12 Snow Cone Cupcakes
-
Snow Globe Cupcake Kit
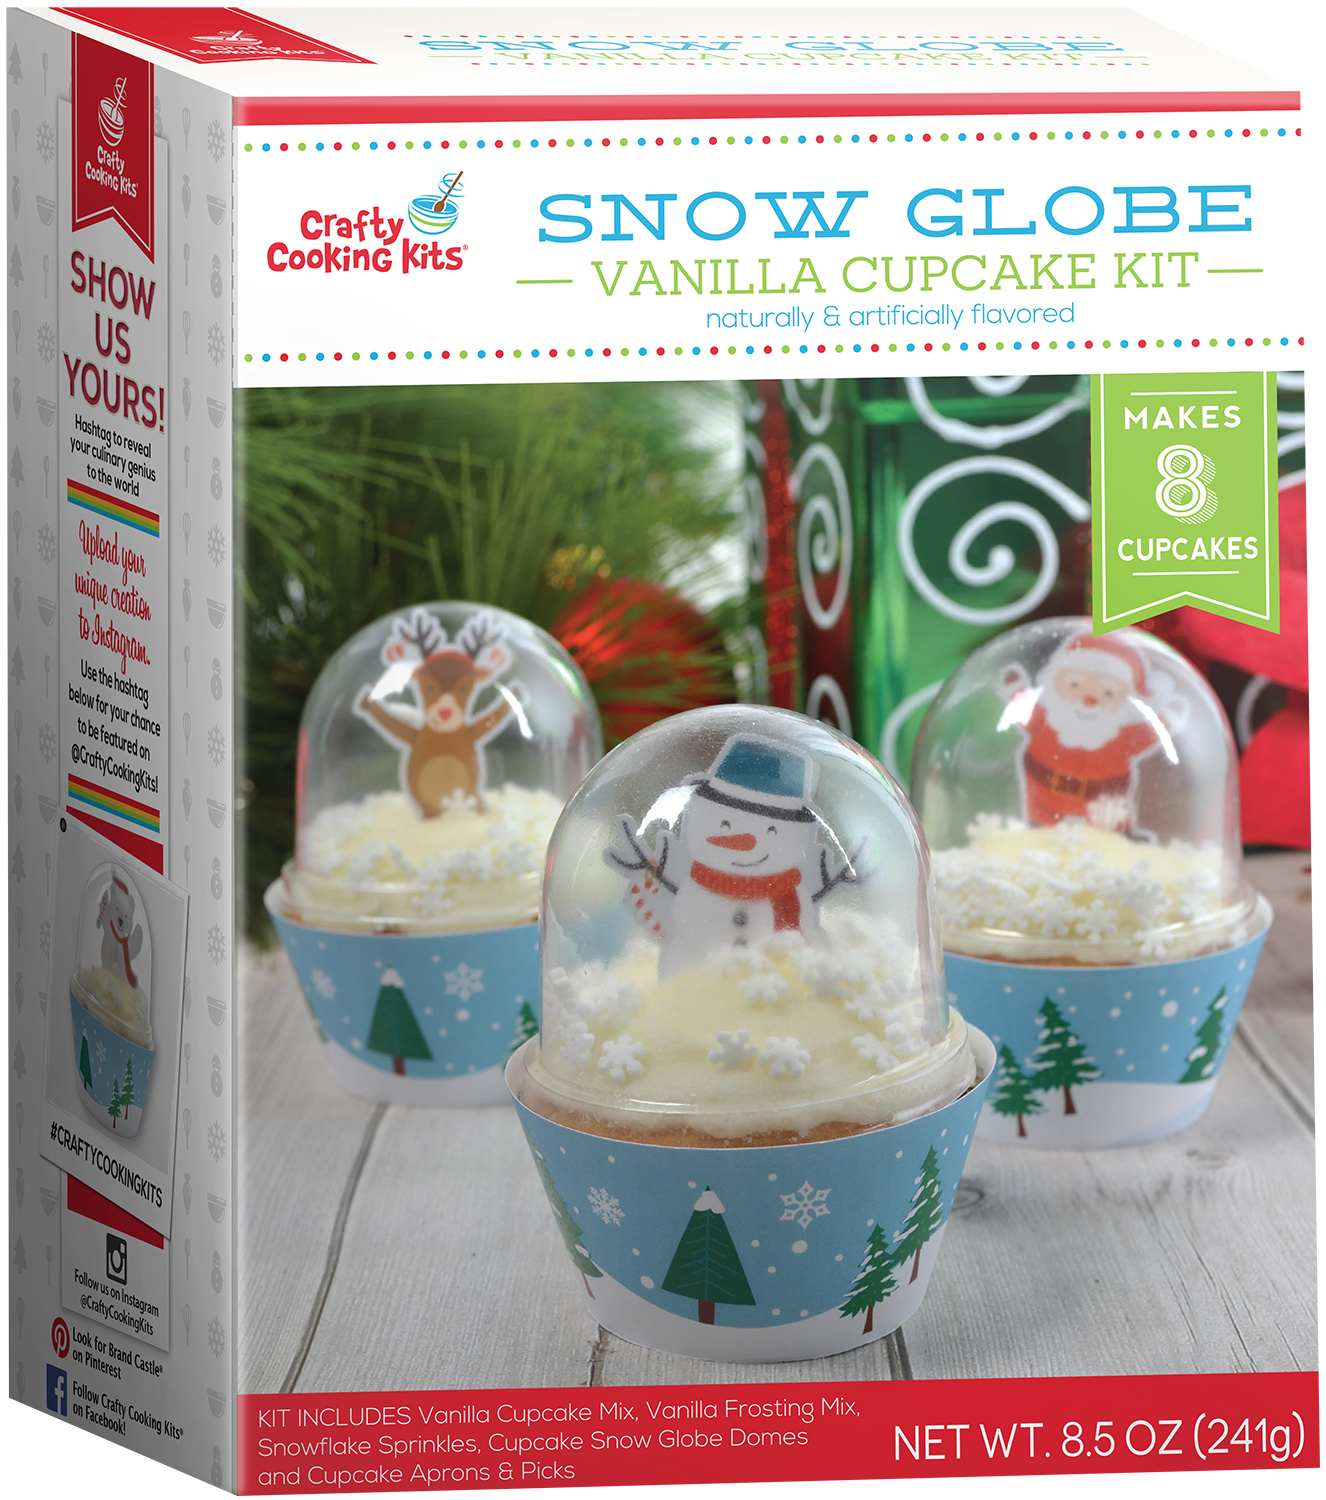
Snow Globe Cupcake Kit
Email These DirectionsYou will need
Vanilla cupcakes:
3 TBSP. room temperature butter
1/3 cup water
1 egg
8 baking linersVanilla frosting:
6 TBSP. room temperature butter
1 1/2 cups powdered sugar
1 TBSP. milk
2-3 TBSP. granulated sugar, optional, for decoratingDirections
Cupcakes
1. Preheat conventional oven to 375˚F. Line muffin pan with 8 liners (not included). Empty snowflake shapes into a small bowl and set aside.
2. Combine cupcake mix, butter, water and egg* in mixing bowl. Beat until well blended. Distribute cupcake batter evenly, using a spatula to scrape all mix from bowl.
3. Bake for 14 to 16 minutes or until toothpick inserted into center comes out clean. Remove cupcakes from oven and cool completely on cooling rack.Frosting
1. Beat room temperature butter on HIGH until light and fluffy, about 1 minute. Add frosting mix and powdered sugar; beat on LOW until combined. Add milk and beat on HIGH until creamy.
2. Use an offset spatula or butter knife to frost each cupcake, creating a rounded dome shape. Sprinkle with a light dusting of granulated sugar if desired, to create a snowy sparkle. Insert a character pick and press a few snowflake sprinkles firmly into the frosting. Place cupcakes in the refrigerator for 5 to 10 minutes or until frosting has firmed.
3. Assemble aprons by interlocking ends and set aside. Divide remaining snowflakes among the snow globe lids. Remove cupcakes from the refrigerator, and one at a time, turn them upside down and press the lid into the frosting. Now turn your cupcake right side up and drop into an apron. Gently shake the cupcake to see the snow globe effect.
Transfer to a serving platter and enjoy!* High Altitude (over 3500 ft.): Add 1/3 cup flour to mix; decrease water to 3 TBSP. Mix only until well-blended. Bake 375˚F 14 to 16 minutes. Makes 9.
Yield: 8 Snow Globe Cupcakes
-
Snowman Cupcake Kit
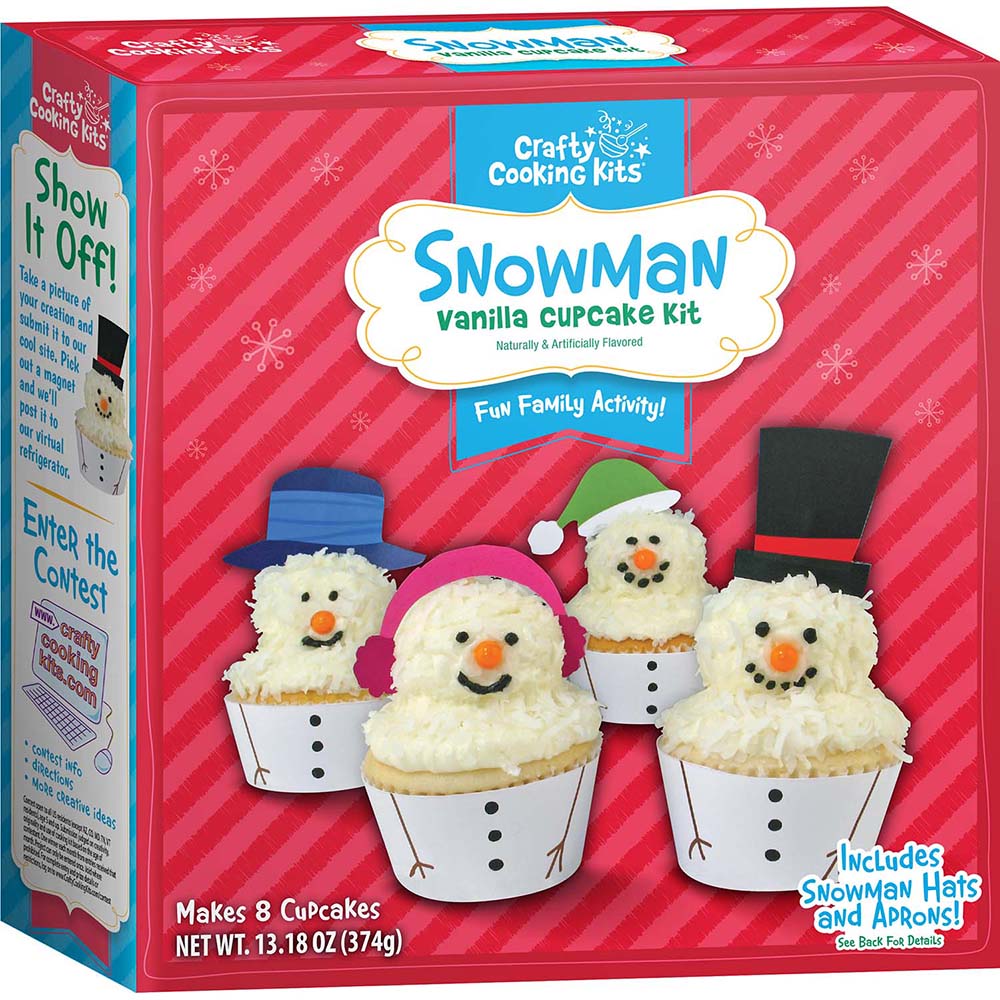
Snowman Cupcake Kit
Email These DirectionsYou will need:
For vanilla cupcakes:
4 TBSP room temperature butter
1/2 cup water
2 eggsFor vanilla frosting:
8 TBSP room temperature butter
2 cups powdered sugar
2 TBSP milk12 baking liners
Cupcakes:
1. Preheat oven to 375°F. Line 12 muffin cups with baking liners (not included).
2. Using an electric mixer, combine cupcake mix, butter, water, and eggs in mixing bowl.** Beat for 30 seconds on LOW until combined, and 1 minute on MEDIUM until thick and smooth. Distribute batter between 12 muffin cups.
3. Bake for 15 to 18 minutes or until toothpick inserted in center comes out clean. Cool cupcakes completely. Assemble aprons by interlocking ends and sit one cupcake in each apron. Set aside remaining four cupcakes.Frosting:
1. Beat room temperature butter with mixer on HIGH until light and fluffy, about 1 minute.
2. Add frosting mix and beat on LOW until combined.
3. Add milk and beat on HIGH until creamy.Create snowmen:
1. Empty coconut pouch into a small ramekin. Remove paper liners from reserved cupcakes and crumble into a small bowl. Add 1 1/2 TBSP frosting and blend well using an electric mixer or mix by hand until mixture can easily be shaped into balls and resembles dough.
2. Roll mixture into 8 balls, place on waxed paper-lined plate, and set in freezer 10 minutes to firm and make assembly easier.
3. Frost remaining 8 cupcakes, creating a little mound in the center and saving enough frosting to cover cake balls. Sprinkle lightly with coconut, reserving 1/3 for heads. Remove cake balls from freezer and place on top of each cupcake, pressing gently into frosting. Carefully frost snowman heads and immediately sprinkle lightly with coconut. HINT: Keep the face free of coconut so decorating is easier.
4. Cut a small tip off of the end of the icing pen and draw eyes and a mouth on each snowman cupcake. Add an orange candy bead nose. Insert a hat pick on top of each snowman cupcake*, transfer to a serving platter, and enjoy!*Remove pick prior to consuming.
**High Altitude (over 3500 ft): Add 1/2 cup flour to mix; decrease water to 1/3 cup. Mix just until blended. Makes 15.Yield: 8 Snowman Cupcakes
-
Snowman Pre-Baked Gingerbread Cookie Kit
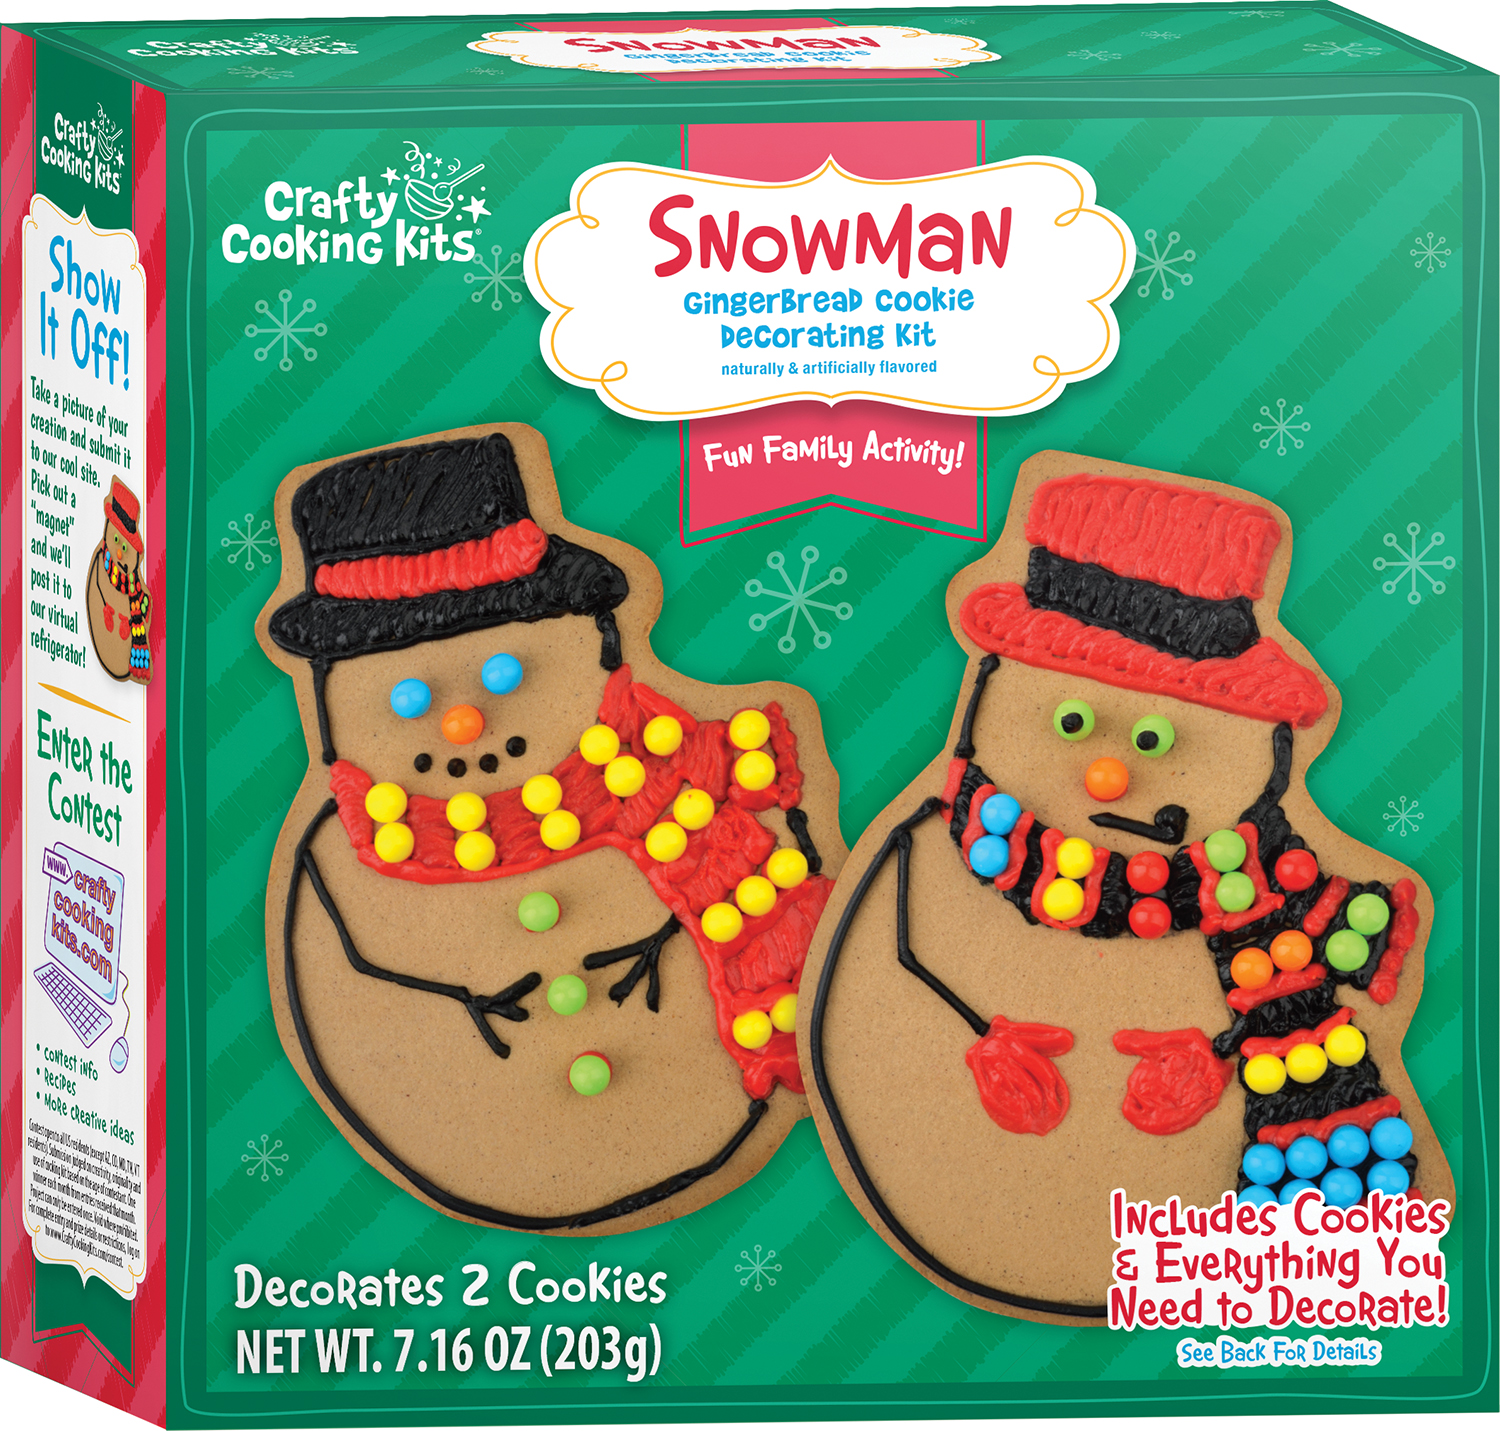
Snowman Pre-Baked Gingerbread Cookie Kit
Email These DirectionsDirections
(Adult Supervision Required)1. Prepare
Adults Remove cookies from packaging and place on clean countertop, embossed side up. Cut small tip off of icing pens. Pour candy beads into a small bowl.
2. Decorate
Kids Squeeze icing onto cookies, following embossed guidelines if desired. Refer to box for inspiration. ADULT HINT: Use a small spatula or kitchen knife to spread icing over larger areas. Secure candy beads with icing as desired. Place cookies on a serving platter and enjoy!Yield: 2 RTE Snowman Gingerbread Cookies
-
Spooky Cat Chocolate Cookie Kit
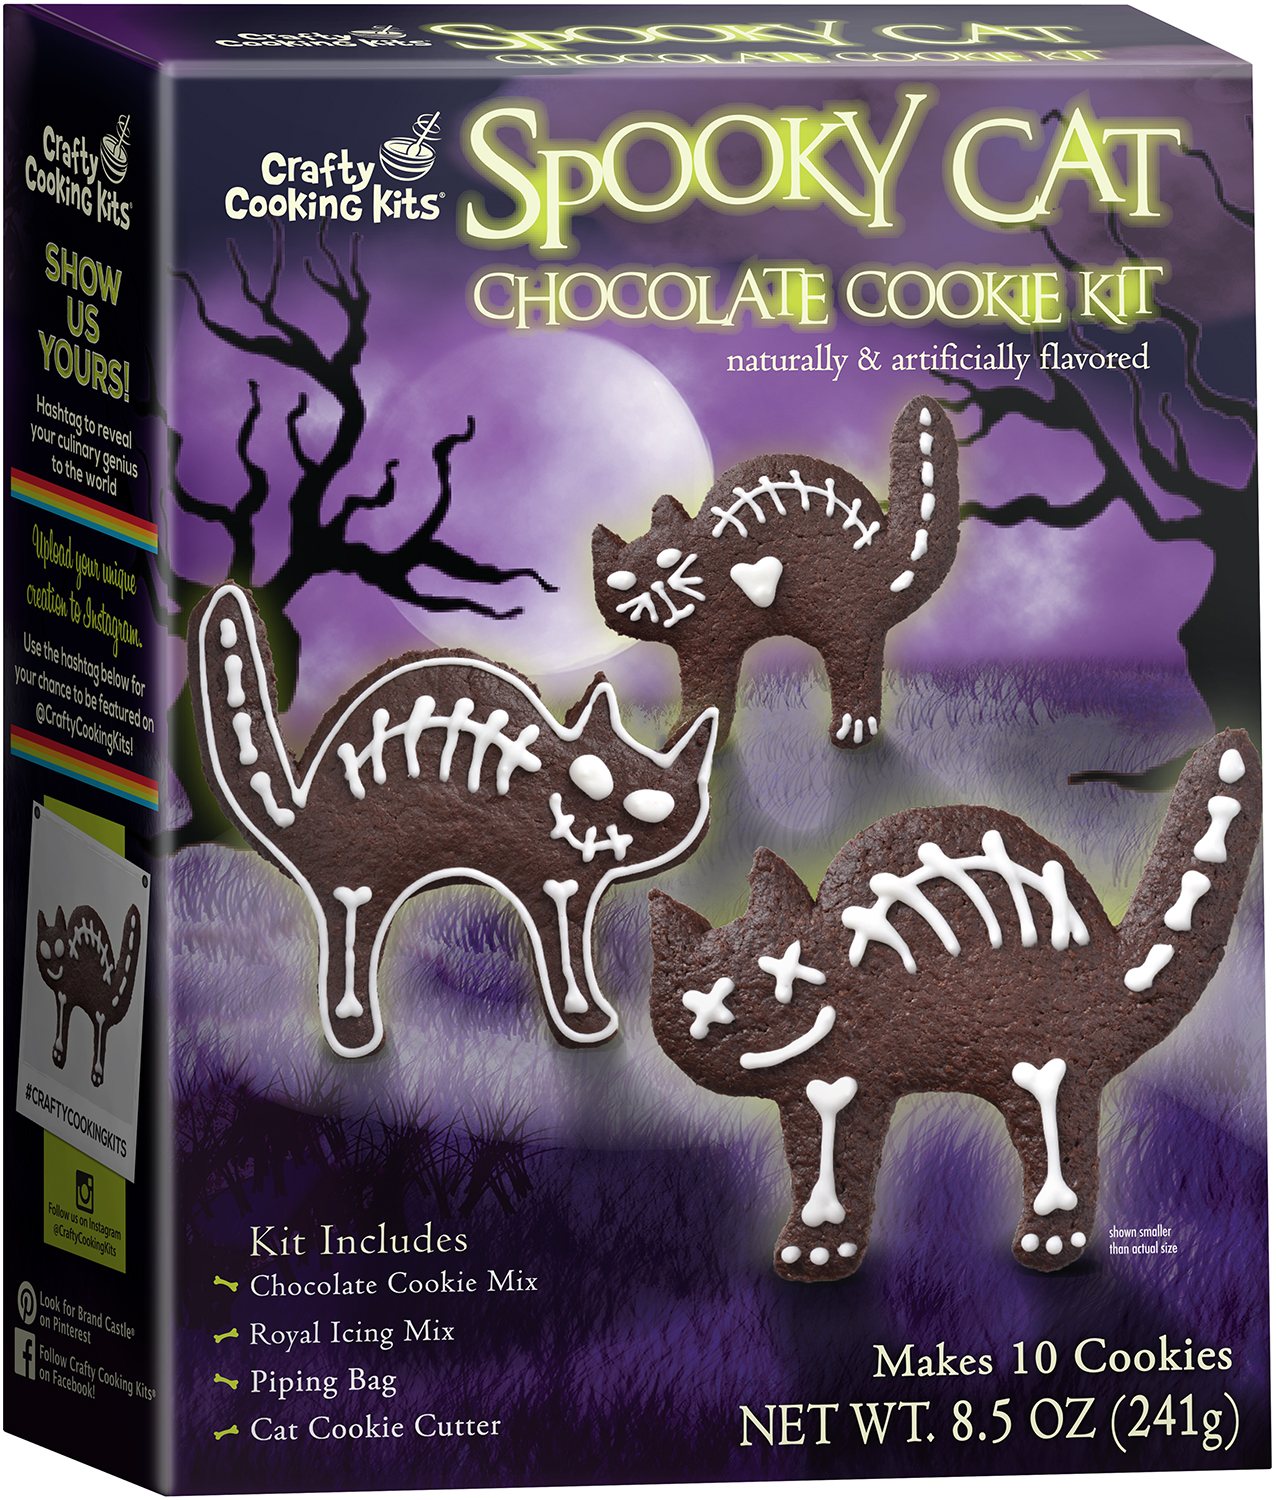
Spooky Cat Chocolate Cookie Kit
Email These DirectionsYou will need:
For cookies:
4 TBSP. room temperature butter
1 eggFor royal icing:
2 ½ tsp. water
1/2 cup powdered sugarDirections
Cookies
1. Preheat oven to 350°F. Lightly spray a baking sheet with cooking spray. Wash cutter with warm, soapy water and dry thoroughly.
2. Combine cookie mix, room temperature butter and egg. Mix until well blended.
3. On a lightly floured surface, roll cookie dough to 3/16-inch thick. Cut into shapes with cutter, rerolling as necessary. HINT: If dough becomes sticky, place in refrigerator for 10 minutes, also sprinkle rolling pin and dough liberally with flour or cocoa powder. Place 2 inches apart on prepared baking sheet.
4. Bake for 9 to 11 minutes or until edges appear done.
5. Let cookies cool on baking sheet for 1 minute. Transfer to rack to cool completely.Royal Icing
1. Dissolve icing mix and water in a mixing bowl. Add powdered sugar and mix with a fork until smooth.
2. Stand piping bag in a glass and pull over edges to hold open. Spoon icing into bag and twist top of bag to close.Decorate
1. Cut a small tip off of the piping bag and pipe boney skeleton detail onto cookies. Refer to box for inspiration.
2. Arrange Spooky Cat Cookies on a serving platter and enjoy.Yield: 10 Spooky Cat Chocolate Cookies
-
The Polar Express Chocolate Cookie Holiday Train Kit
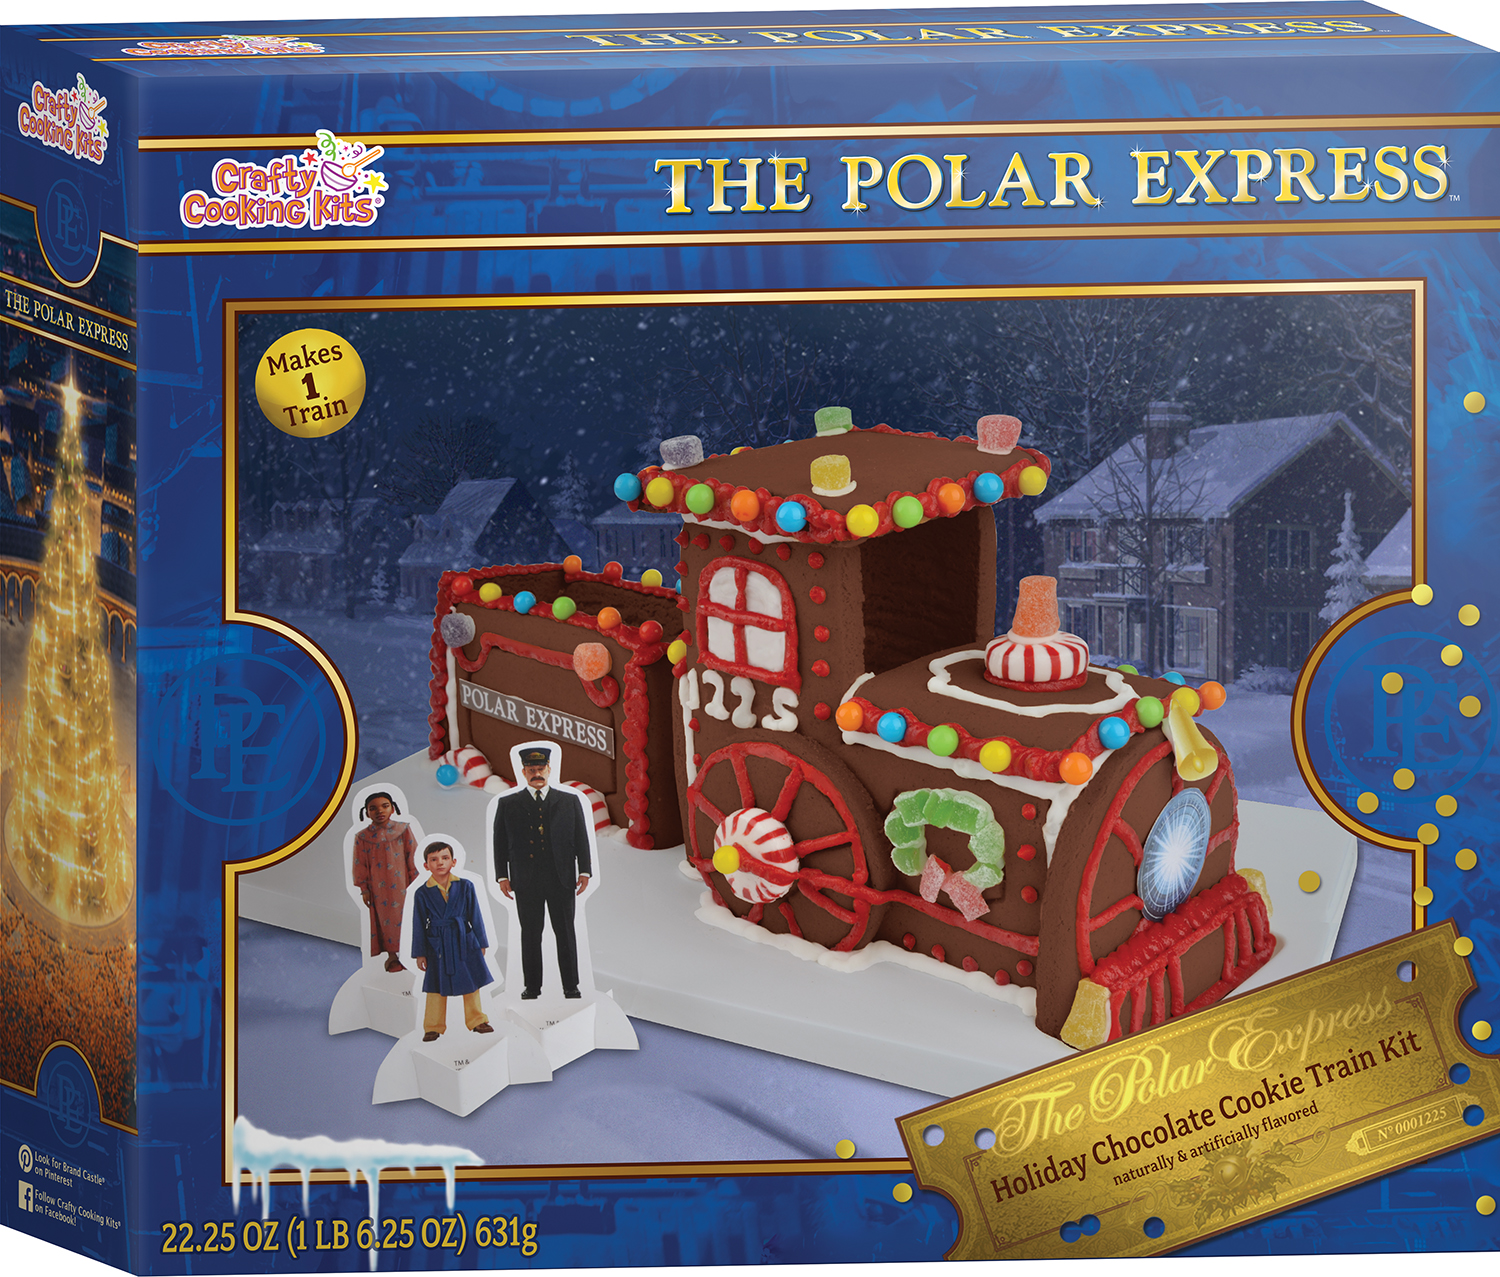
The Polar Express Chocolate Cookie Holiday Train Kit
Email These DirectionsYou Will Need
4 TBSP. room temperature butter
1 cup powdered sugar
1 TBSP. milkDIRECTIONS
(Adult Supervision Required)PREPARE
Kids Be sure to wash hands. Cooking can be messy work. You might want to wear a smock or apron. Knead icing pouch for 1 minute to a soft, smooth consistency. Remove candies from pouches and set aside for decorating.
Adults Carefully remove cookie pieces from packaging and break apart panels along deep score marks. Lay out on countertop with rough sides of cookies facing up. HINT: Always decorate cookies on the smooth side and assemble on the rough side. Refer to diagram to help identify all pieces to be used in assembly. To start the flow of icing, snip the tip of the icing pouch to a 1/4-inch opening. Be careful not to cut the opening too large. NOTE: The white icing is used to build the train but you will have extra to add decorative accents later.BUILD
Adults Pipe a line of icing in the channels of the engine portion of the train base.
Pipe a strip of icing along both long edges of piece C and stand in the channel at the rear of the engine portion of the base. Press pieces A and B into the side channels and press gently against C to adhere. Pipe a strip of icing along the edge of the back of piece E and press gently into position on the front of the engine. Let engine set for 3 minutes. Pipe a strip of icing on the top of pieces A and B and press pieces D and F into position as shown. Finish your engine by squeezing a strip of icing along the back of piece I and pressing into place. Wheel pieces G and H can be adhered to the side of the engine with a small dollop of icing. Pipe a line of icing in the channels of the caboose portion of the train base. Squeeze icing next to the edge on the short sides of pieces J and K. Press J, L, and M into the channels and position piece K into place to finish the caboose. Allow engine and caboose to set for 10 minutes before decorating.DECORATE
Adults Drape a piping bag over edges of a glass to make filling easier and fill with the balance of the white icing. Cut a small tip off the bag and twist top to close. Set aside while you prepare the red frosting. Place room temperature butter in the bowl of a stand mixer and beat on HIGH until light and fluffy, about 1 minute. Add frosting mix and powdered sugar; beat on LOW until combined. Add milk and beat on HIGH until creamy. Use a spatula to fill the second piping bag with frosting in the same manner as before. Cut a small tip of the bag, twist the top of the piping bag to close, and gently squeeze frosting to the tip. HINT: Do not cut the tip too large; a small tip works best for fine details.
Kids Decorate train with frosting and candies, using small dabs of frosting and remaining white icing to hold candies and paper décor pieces in place. HINT: Gumdrops can be rolled flat and cut into decorative strips and shapes. ADULT HINT: Starlight wheels can be cut using a gentle sawing motion with a sharp knife. Refer to box for inspiration. Insert character paper pieces into their paper stands and place around train as desired. Allow train to dry completely before carefully moving, if necessary. Admire and enjoy!Yield: 1 Chocolate Cookie Train
13 oz. RTE NT chocolate cookie train
6 oz. RTU white icing
1 oz. rainbow candy beads
1 oz. rainbow gumdrops (John Vince)
.75 oz. (5 pieces) starlight red/white peppermint pinwheels
.5 oz. red frosting mix
2 piping bags
s/3 character pieces w/stands and paper décor pieces
1 thermoform plastic train base
spacer -
Trailer Park Santa Gingerbread Kit
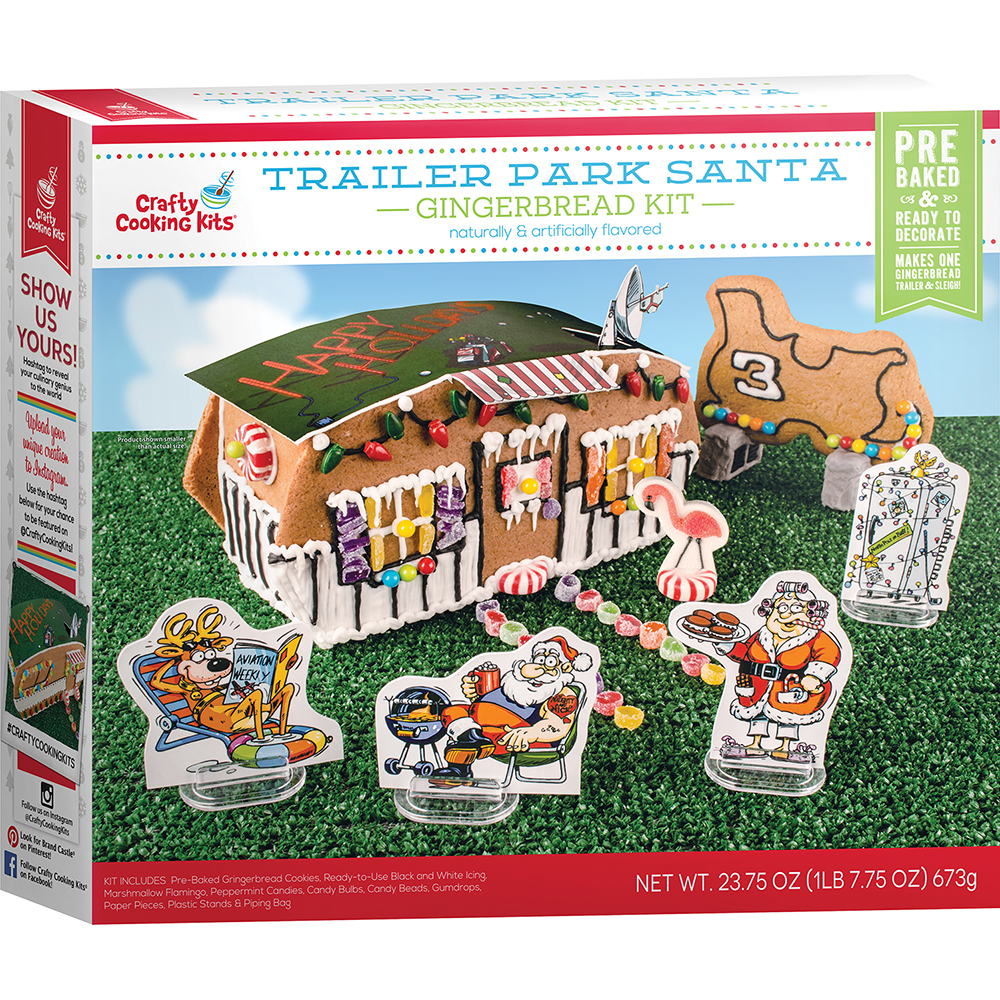
Trailer Park Santa Gingerbread Kit
Email These DirectionsYou will need:
1 large cutting board or platter, for use as base
small bowl for mixing icing
plastic resealable sandwich bag, optional, for decorating*Before decorating, read directions all the way through to ensure complete understanding.
*We recommend decorating on the smooth side of the cookie, however, if you are feeling inspired to create your own design, flip the cookies around and decorate on the rough side!1. Knead icing pouches. Remove candies and paper pieces from pouches and set aside. Carefully remove cookie pieces from packaging and lay out on counter (see Kit Includes for reference).
2. Cut a 1/4 inch tip off of the white icing pouch. Pipe a line of icing along the bottom edge of the front piece A. Pipe a line of icing along bottom edge of end piece C (see Figure 1). Stand front and end pieces onto platter (smooth sides facing out) and press edge of piece C onto front piece (see Figure 2). Hold for a few minutes to set. Repeat process with remaining back and end pieces B & D. Allow trailer to set for 10 minutes before continuing.
3. Pop satellite up from roof piece by pressing along perforated lines. Once trailer has set, pipe a line of icing along top edges and carefully press roof piece into position. Hold for a minute and allow to set.
4. Break cinderblock pieces F apart to create 4 separate cookies. Pipe a line of white icing along the edges of one of the cinderblock pieces and place a matching piece on top, rough side to rough side, (see Figure 3). Repeat with remaining 2 pieces to create 2 cinderblock supports for the sleigh. Allow to set for a few minutes.
5. Squeeze approximately 2 TBSP. of white icing into a small bowl. Cut a small tip off of the black icing pouch and squeeze a gumdrop-sized amount into the bowl. Mix well to blend to a gray color. Use a small butter knife to spread onto all 4 smooth sides of each cinder block base and set aside to dry. Refer to box for inspiration.
6. Drape edges of the piping bag over a tall glass to hold open and empty remaining contents of black icing pouch into piping bag. Twist top to close and cut a small tip off the bottom. HINT: Do not cut the tip too large; it is better to cut smaller than you think and adjust accordingly.
7. Squeeze some white icing into a resealable sandwich bag and cut a small tip for fine detailing. Decorate trailer and sleigh piece E with icings; secure candies with dabs of icing. Gumdrops can easily be cut into smaller pieces for use as shutters and walkways. HINT: Use a rolling pin to flatten gumdrops on a smooth surface dusted with granulated sugar. Peppermint wheels can be cut with a serrated knife as needed. Marshmallow flamingo can be iced to platter, side of trailer or to half of a peppermint candy to stand upright. HINT: Coconut flakes tinted with green food coloring make fun, overgrown grass.
8. Once sleigh décor has dried, pipe a line of icing in the groove on top of cinderblocks and stand sleigh in place (see Figure 4). Hold to set for 1 minute.
9. Insert each paper piece into a plastic stand and position around trailer as desired. Allow trailer park pieces to dry for 1 hour before carefully moving, if necessary.
* Remove paper roof prior to consuming.
Yield: 1 Trailer Park Santa Gingerbread Cookie Kit
-
Trolls Sugar Cookie House
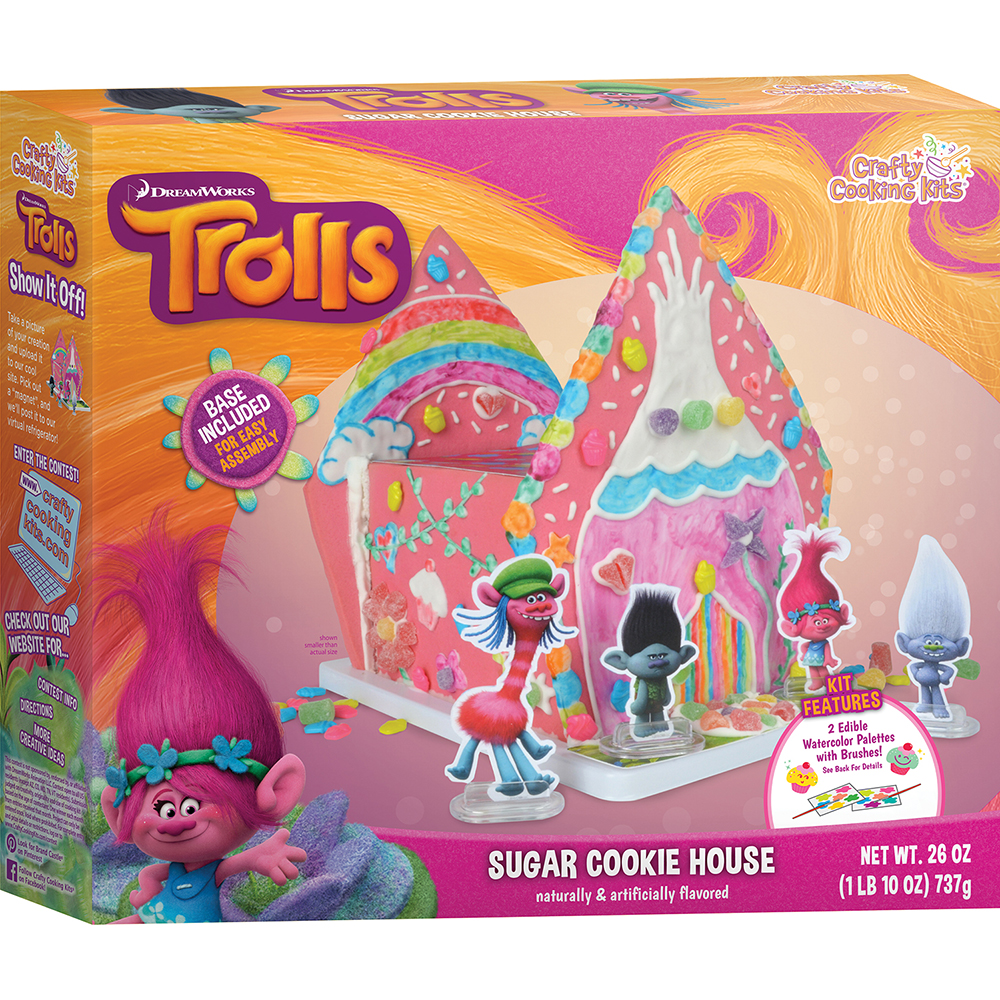
Trolls Sugar Cookie House
Email These DirectionsYou will need:
1 1/2 tsp. water to thin icing**Adult supervision required.
Ice (Plan ahead, needs time to set)
Adults Carefully remove cookie pieces from packaging and lay out on a flat surface with smooth sides of cookies facing up. Knead icing pouch for 1 minute to a soft, smooth consistency. Snip the tip of the icing pouch to a 1/4-inch opening. Squeeze half of the icing pouch into a small bowl. This will be used to decorate the house. Set aside the remaining pouched icing to assemble the house later. Add water to the icing in the bowl and stir well to combine. Insert the piping bag into a tall glass and pull over edges to hold open. Use a spatula to pour and scrape icing into piping bag. Twist top to close and cut a small tip. HINTS: Do not cut the tip too large, you can always make it larger later if necessary. Use a small rubber band to help hold the top closed.
Kids Gently squeeze icing to the tip and pipe designs on cookie pieces. Use a knife or spatula to help cover large areas. HINT: Keep in mind that one of the pieces will become the back of the Trolls House and only the top portion will show. Refer to box for inspiration. Save leftover icing to apply candies and gumdrops once the house is built. Set pieces aside and allow to dry at least 30 to 45 minutes. You can place them in the refrigerator to help speed the process. ADULT HINT: Assist kids with icing; only iced surfaces of the cookie can be painted later. Once the icing has fully dried, you can pipe over areas to create textured surfaces. Let those areas dry before painting.Paint
Adults Place a bowl of water and paper towel next to each work area. Remove watercolor palettes and paintbrushes from pouches.
Kids Wet brush and tap to remove excess water. Place tip of brush into part of one color on edible watercolor palette and rub gently to activate color. Paint cookies as desired, rinsing brush between colors. Allow painted areas to dry before assembling house.Build
Adults Pipe a line of icing in the channels of the house base (Figure 1). Squeeze a thick line of icing on the edge of each of the side wall pieces (Figure 2). Stand the front house piece into the base channel. Insert one of the wall pieces into the corresponding base channel and press against the front piece. Repeat with the other wall (Figure 3). Be mindful of touching the icing on the decorated pieces. Turn the back house piece so that the decorated side faces the interior of the house, place into channel, and press against side walls to secure (Figure 4). Apply a line of icing along the underside edge of the cardboard roof. Gently attach roof piece and allow house to set for 15 minutes before decorating with candies.
Kids Empty candies and gumdrops into small bowls. Apply to house using dabs of icing, pressing gently to adhere. ADULT HINT: Use kitchen scissors to cut gumdrops if desired. Squeeze a bit of icing on the base and press the grassy area next to the front door. Insert the character pieces into the clear plastic stands and arrange them around the house. Admire and enjoy!Yield: 1 Trolls Sugar Cookie House